Browser automation allows you to automate tasks in XLogin's browser configuration file. From creating simple automated scripts to complex web crawlers, you can search, collect, and interact with web data.
XLogin browser automation is based on Selenium WebDriver.
Normally, if you run Selenium code, you must connect to the Chrome driver first and then set up the necessary functions. You don’t need this step When using XLogin with Selenium code. You will use the Remote Web Driver program to connect to the XLogin application or a browser configuration file through a local port, set up the required functions, and execute Selenium commands in a predefined browser configuration file.
Languages
The Selenium framework provides multiple languages that can be used together, so XLogin automation can also run on multiple coding languages. But at present, we only provide technical support for Java and Python.
Using Selenium in XLogin
Define XLogin port: To use Selenium automation, you need to define the software port in advance. Here is how to define the port:
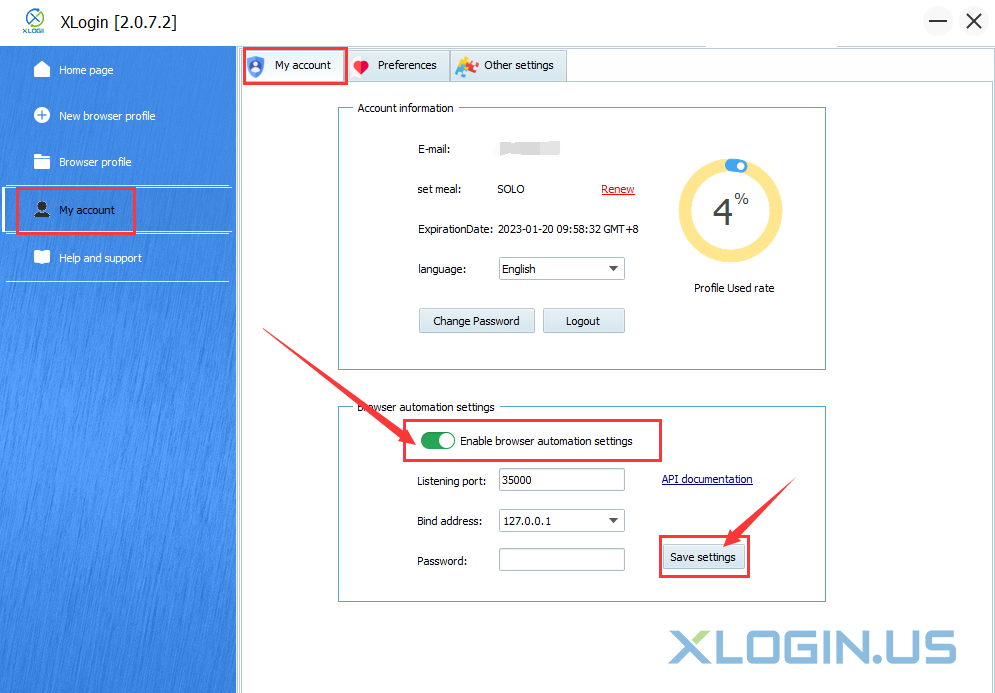
In "My Account", turn on the browser automation setting, and set the usable port in the listening port. The default value is 35000, You can also set an access password.
Then, you can connect to XLogin through the defined port.
The interface can also pass in proxy server information. If the incoming proxy information will overwrite the proxy information in the configuration file, this overwriting is temporary and will not modify the configuration file. It is only valid for the automation interface:
http://127.0.0.1:35000/api/v1/profile/start?skiplock=true&profileId=xxxxxxxx-xxxx-xxxx-xxxx-xxxxxxxxxxxx&proxytype=socks5&proxyserver=ip&proxyport=1080&proxyusername=&proxypassword=
There are four types of agents:
proxytype=http
proxytype=https
proxytype=socks4
proxytype=socks5
The proxy username and password can be left blank.
Python Case: (After installing Python, use cmd first to enter the Python\Scripts directory, then run pip install selenium and pip install requests):
from selenium import webdriver
from selenium.webdriver.chrome.options import Options
import requests

mla_profile_id = 'xxxxxxxx-xxxx-xxxx-xxxx-xxxxxxxxxxxx'
mla_url = 'http://127.0.0.1:35000/api/v1/profile/start?skiplock=true&profileId='+mla_profile_id

resp = requests.get(mla_url)
json = resp.json()

#Determine the return status of json. If it's ERROR, terminate the process and prompt an error message.
errorcode='ERROR'

statuscode=json['status'] #json return status

if errorcode==statuscode:
    print(json['value']) #print the error information
    quit() #terminate the program

print(json['value'])

chrome_options = Options()
chrome_options.add_experimental_option("debuggerAddress", json['value'][7:])
chrome_driver = r"chromedriver.exe"
#https://down.xlogin.us/92.0.4515.131.zip?swcfpc=1
#download the chromedriver file and place it in the python directory
driver = webdriver.Chrome(chrome_driver, options=chrome_options)

driver.get('https://www.xlogin.us/')
executor_url = driver.command_executor._url
session_id = driver.session_id
print(executor_url)
print(session_id)
print('ok it is done')

driver.quit()
Python Case: (The following code is required for using selenium version 4, while the previous code will cause an error in selenium version 4.)
from selenium import webdriver
from selenium.webdriver.chrome.options import Options
import requests
from selenium.webdriver.chrome.service import Service as ChromeService
from webdriver_manager.chrome import ChromeDriverManager


mla_profile_id = 'xxxxxxxx-xxxx-xxxx-xxxx-xxxxxxxxxxxx'
mla_url = 'http://127.0.0.1:35000/api/v1/profile/start?skiplock=true&profileId='+mla_profile_id

resp = requests.get(mla_url)
json = resp.json()


#Determine the return status of json. If it's ERROR, terminate the process and prompt an error message.
errorcode='ERROR'

statuscode=json['status'] #json return status

if errorcode==statuscode:
    print(json['value']) #print the error information
    quit() #terminate the program

print(json['value'])

chrome_options = Options()
chrome_options.add_experimental_option("debuggerAddress", json['value'][7:])

service = ChromeService(executable_path=json['chromedriver'])

driver = webdriver.Chrome( service=service ,options=chrome_options)

driver.get('https://www.xlogin.us/')
executor_url = driver.command_executor._url
session_id = driver.session_id
print(executor_url)
print(session_id)
print('ok it is done')

#driver.quit()
The chromedriver file is available in each kernel installation directory, and the API to start the browser interface /api/v1/profile/start will also return the full path location of the chromedriver file.
Selenium antidetect can be set in Browser profile settings -> Other Configurations -> Customize Launch Browser Parameters to include "--disable-blink-features=AutomationControlled", which will have a certain effect.
Please pay attention to the Kernel version of the XLogin browser
If the Kernel version is 92, download this one:
https://down.xlogin.us/92.0.4515.131.zip?swcfpc=1
If the Kernel version is 96, download this one:
https://down.xlogin.us/96.0.4664.45.zip?swcfpc=1
All Kernels Download link:
https://www.xlogin.us/help/docs/getting-started/download-the-xlogin-kernel/
If the chromedriver version is not corresponding, it will cause failed automation.
If you cannot close the browser, you can use http://127.0.0.1:35000/api/v1/profile/stop?profileId=xxxxxxxx-xxxx-xxxx-xxxx-xxxxxxxxxxxx interface to close the browser process of the specified configuration.
If you can only open the browser when running the code, but cannot open the website, you may copy and paste the chromedriver.exe to your python installation directory, or you select the mobile emulation mode which may cause this problem.